Please Note: This feature is no longer supported. We recommend using web hooks or our API to trigger review invitations on the platform of your choice.
Introduction
Customer reviews have become an integral part of building trust around a brand, reviews also play an increasingly important role in Search Engine Optimisation (SEO). For some time now search engines such as Google collate reviews from trusted partners and show a rating from 5 stars in the search results.
Paid ads and organic search results that display a star rating can enjoy a bump in click through rates by as much as 10%. So collecting reviews can be a very effective and low cost component of your marketing strategy, word of mouth is a very powerful medium.
Collecting Google Reviews in QuickFile
QuickFile works with Google to allow merchants to collect customer reviews from with the client control panel. In fact we simply display a box asking if the customer if they are happy to provide a review. It will look something like this:
If the customer agrees Google will send an email to the customer 2-3 days from when their order is completed to ask them to rate their experience.
Google will not send any other emails as a result of the customer opting in. The email contains a one-minute survey that looks like this:
As a merchant Google will provide you with a control panel where you can keep track of your customer reviews. Google will also provide some code snippets you can add to your website to show your average seller rating.
Google publish a general guide on Google Reviews here:
If you read on we’ll show you how to set things up.
Setting up Google Reviews
Google Reviews is really easy to setup, but first you will need to confirm a couple of things.
- I have a website and it is secured by HTTPS (Google Reviews only works with secure sites).
- I have root access to my site, you will need to upload a small HTML snippet that we will provide you.
- Your clients are viewing and paying invoices via the QuickFile client control panel, this is where we display the opt-in.
If you can answer YES to the three questions above then you’re good to go. If you haven’t done so already you will first need to register a free Google Merchant account. You can register from the link below:
Once you have setup this account with Google, from the dashboard click on the 3 dots in the top right and select “Merchant Center Programs” from the menu.
You will then see a “Customer Reviews” card, you will need to click the corresponding “ENABLE” link to switch on this feature.

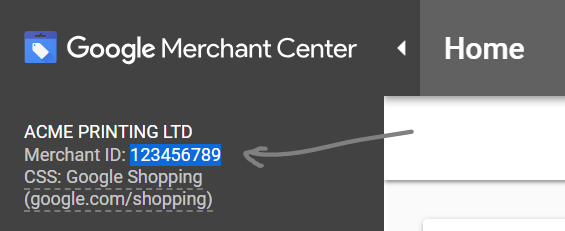
Once enabled you will need to provide some basic information about your website. Google will then show you a snippet of code, you don’t need to worry about this, although you should copy your “Merchant ID” from the Google Merchant dashboard, you will need to enter this into QuickFile later.

Configuring QuickFile to trigger the Review Opt-In
You can now jump over to your QuickFile account. From the top menu select “Account Settings” then “All settings”. Scroll down to the “Third Party Integration” area and you should see an option for Google Reviews.
You will now need to enter your “Merchant ID” and “Website URL” (excluding the https:// prefix). The Website URL must match what you supplied to Google in the Merchant Center.
You will also see an option for “Average Delivery Days”, this is an approximate average of how long it takes to fulfil orders, it allows Google to determine exactly when to prompt the end customer for a review. Whatever you provide here Google will add on another few days for good measure.
Finally you will see two options for “Consent Placement”, this tells us where we should display the opt-in box to the customer - either before payment (Checkout Page) or when the order has been confirmed (Order Confirmation Page). Generally we find the best place to display this box is on the checkout page, just before payment is supplied.
Uploading the HTML Snippet
When you save your settings in QuickFile you will then see an option to download a HTML snippet. This needs to be uploaded to the root of the website specified on the form. Once uploaded the file path would be accessible on the following path:
https://www.mywebsite.co.uk/g-seller.html

You will also see an option to test the HTML snippet, clicking this link will open a new page that will display the custom opt-in box. If you don’t see this then you would need to check the following.
- Make sure the HTML snippet is accessible from your website and can be called securely with the
https:\\prefix.- Make sure the HTML snippet is residing on the root of the website that you have configured in your Google Merchant account.
- QuickFile will call the HTML snippet into an iFrame, you need to ensure that the
g-seller.htmlsnippet does not return the headerX-Frame-Options: denyin the response as this will prevent the HTML snippet from being framed.
If you have any issues with the HTML snippet please don’t hesitate to post a question on our public forum.
Setting your Review Collection to Live
Once your HTML snippet is uploaded and tested you can now enable review collection. At the bottom of the Google Reviews settings form in QuickFile you will see a check box to set your reviews to live.
Your clients will now receive an opt-in notification whenever they enter the checkout or order confirmation screen within your QuickFile Client Control Panel.


