Introduction
The Advanced Customisation tools are available to all Power-User Subscribers and offer a unique way to control a number of key visual aspects within QuickFile through the use of CSS and HTML. These tools are divided into two different sections:
- preset templates
- HTML snippets
What are preset templates?
Preset templates allow you to inject your own custom CSS and HTML into key areas within QuickFile. When you open the Advanced Customisation area you will see a left hand column with a list of preset templates. Clicking any of these templates will open up an editor window where you can start inputting your own custom CSS or HTML.
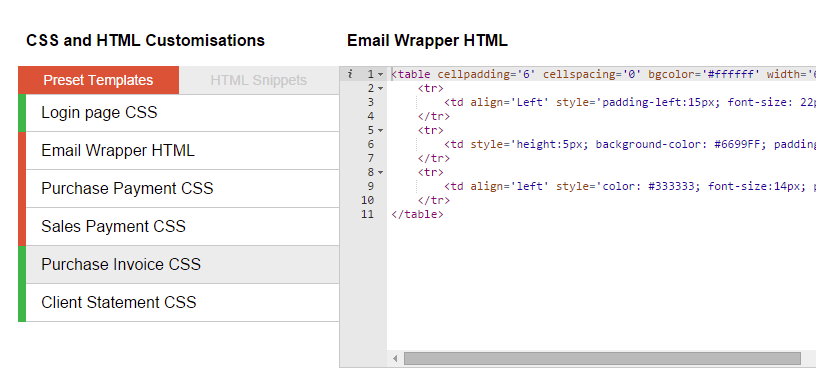
Here is a list of currently supported preset templates, with a short description.
-
Login Pages CSS
Custom CSS is embedded into your login and password recovery pages. -
Global CSS
The global CSS template is embedded within each page of your account. -
Email Wrapper HTML
Custom HTML for all outbound emails sent from your account. -
Purchase Payment CSS
Custom CSS applied to supplier payments (Remittance Advice). -
Sales Payment CSS
Custom CSS applied to client payments. -
Purchase Invoice CSS
Custom CSS applied to supplier purchase invoices. -
Client Statement CSS
Custom CSS applied to client statements. -
Client Area CSS
Custom CSS embedded within all end-user client facing pages. -
Client Area Header and Footer HTML
Custom HTML header and footer banners embedded within all end-user client facing pages. -
Custom Scripts
Run custom Javascript or JQuery within your account. Offers a great way to pre-fill forms, set preferences and extend the UI.
What are HTML snippets?
HTML snippets are nothing more than your own blobs of HTML that can be injected into key areas within QuickFile. You can view and create HTML snippets by first clicking on the HTML Snippets tab.
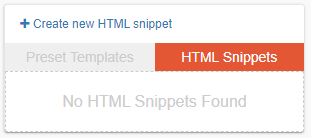
You will then see a link to create new snippets and a list of any pre-existing HTML Snippets. There are at the time of writing very few uses for HTML snippets, but it is envisaged that over time new areas within QuickFile will be added where these blobs of HTML can be embedded. These will include document footers, client control panel pages, and the primary login screen. We will update this section when the aforementioned areas of customisation go live.
Subscription Model
The Advanced Customisation tool-set is currently available to use only in a live environment with a Power User Subscription.
Tips for using the Advanced Customisation tools
To get the full use of these tools it is necessary to have a good grasp of CSS and HTML. If you don’t have the time to learn these technologies, then any proficient web developer should be able to assist you.
When working with any CSS customisations it’s important to be able to use your browser’s debugging tools (usually accessible by pressing F12) to navigate the Document Object Model (DOM) of the page. This will reveal the names of the classes and IDs of the elements you want to manipulate.
In Google Chrome for example, simply right click in the area you want to edit and select the “Inspect Element” option in the menu.

You can then click on the various elements to discover the class names. The selected area will also be visible in the browser view to indicate which part you’re looking at.

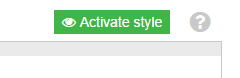
Activating and deactivating custom templates
Any new template you save will automatically be inactive. This allows you to edit and preview your design before committing it to your account. The status of any template can be determined by the left hand edge, adjacent to the template name.

You can activate or deactivate a template using the button in the top right corner above the editor window.
Previewing your custom templates
Whenever a template is saved you will see a preview link within the save confirmation message. This will apply your custom template to a document on your account so that you can preview it.
Please note: Occasionally your browser may cache the CSS. If you are previewing the template in a different tab, when you refresh the page hold down CTRL to purge the cache.
How to customise a specific area in QuickFile?
If there’s a particular area in QuickFile that you’d like to be able to customise via CSS or HTML, please post a suggestion on our forum. If it’s feasible we will look at implementing it.