Automated bank tagging gets your bookkeeping done much faster by teaching QuickFile how to deal with certain transactions. Rather than tagging the same routine entries on your bank statement again and again, set up a rule and QuickFile will do the bank tagging for you.
A rule works on new transactions however they reach QuickFile: uploaded from a CSV file, imported from a bank feed or entered manually.
Prefer to watch?

Prefer a video walkthrough? Watch our Automated Bank Tagging Rules tutorial on the QuickFile Help Guides YouTube channel.
What is a bank tagging rule?
A bank tagging rule is a simple filter. It looks for some matching text in each new bank transaction and, when it finds a match, tags the item the way you’ve told it to, for example as a payment to a particular supplier.
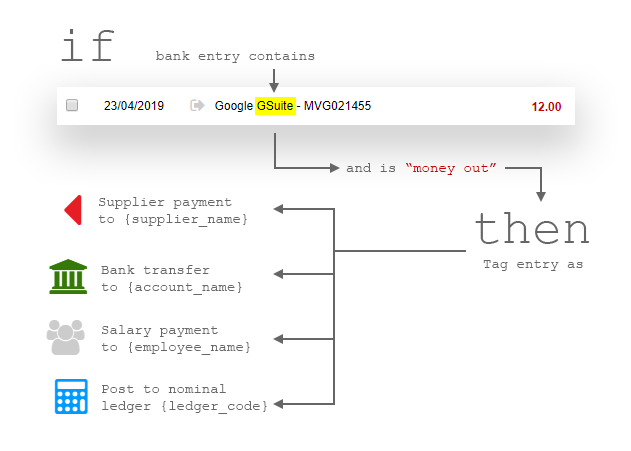
The matching text can be found anywhere in the bank reference (Contains), at the start (Starts with) or at the end (Ends with). Matching isn’t case sensitive.
Important: Bank tagging rules are a very powerful automation tool and can create hundreds of invoices automatically when you upload your bank statement. We recommend that you start by keeping Auto Tagging switched off, or set your rules to manual confirmation, until you’re confident that the rules are working as intended.
How do I create a rule while tagging?
This is the quickest way to build up your rules. When you tag a bank transaction, QuickFile offers to create a rule from that transaction and the allocation you’ve just made.
-
On your bank statement, click Tag Me next to the transaction.
-
Choose the type of transaction, for example Payment to a supplier, and fill in the details as usual.
-
Before you save, tick Create a rule to process matching transactions in the same way. QuickFile shows the text it will match, for example Apply to bank transactions containing ‘SAMPLE SUPPLIES LTD’.
-
Click Save. The transaction is tagged and the new rule is added to your bank tagging rules.

Please note: The option only appears when QuickFile can pick out enough text from the bank reference to make a useful rule. If you don’t see it, create the rule manually instead (below).
How do I create a rule manually?
You can create a rule at any time from the rule management area. To get there, go to Banking > Bank tagging rules:

Or, on the Bank Management screen (Banking > All bank accounts), click Options and choose Bank Tagging Rules:

Then:
-
Click Create.
-
In Match Text, enter the text to look for, for example
ABC123. You need at least 4 characters. -
Choose Contains, Starts with or Ends with.
-
Click Money In or Money Out. QuickFile checks your existing bank transactions and tells you how many match, for example We found 1 matching transaction containing this text. Click the number to see them.
-
If the rule should only match one amount, enter it in Amount. Leave it blank to match any amount.
-
Choose what QuickFile should do with matching transactions, for example Payment to a supplier.
-
Fill in the details. For a supplier payment, enter the Supplier Name, and optionally a Description, Purchase Category, VAT Rate, VAT Options and project tags.
-
Click Save. You’ll see Your tagging rule is now active! The rule will apply to newly entered transactions.


| Money Out actions | Money In actions |
|---|---|
| Payment to a supplier | Payment from a customer |
| Salary, dividend or other drawings | Bank transfer between accounts |
| Bank transfer between accounts | Something else not on this list |
| Tax payment to HMRC (e.g. VAT, PAYE or Corporation Tax) | |
| Something else not on this list |
Tip: Leave Description empty and QuickFile uses the bank reference as the description.
Please note: For Payment to a supplier, Attach to an Invoice is ticked, so each matching transaction creates a new purchase invoice. Untick it to credit the money to the supplier’s account without creating an invoice. You can then allocate it to an invoice later.
How do I confirm a matched transaction?
While Auto Tagging is switched off, QuickFile doesn’t tag matching transactions by itself. Instead, a new transaction that matches a rule shows an orange Confirm button instead of Tag Me. We call this semi-automated bookkeeping: the rule does the work of identifying the transaction, and you stay in control of applying it.
-
On your bank statement, click Confirm next to the transaction.
-
Check the summary under Confirm Automatic Tagging: the matching text, what the item will be treated as, the supplier or customer, description, category and VAT.
-
Click Confirm to tag it as shown, or Manually Tag to tag it yourself instead.


How do I manage my rules?
All your rules are listed under Banking > Bank tagging rules. From here you can:
- search for a rule by its matching text,
- sort by Matching Text, Created or Match Count (how many transactions the rule has matched), to see which rules you use most,
- switch a rule off or on with its Enabled toggle (while Auto Tagging is off),
- open a rule with View/Edit,
- delete a rule with the red cross, or tick several and click Delete Selected.
Important: A rule only applies to transactions entered after it’s saved. It isn’t run against transactions that are already on your bank statement, so tag those yourself.
How do I switch on Auto Tagging?
Once you’ve tested your rules and you’re confident they work, you can let QuickFile tag matching transactions without asking you.
-
Go to Banking > Bank tagging rules.
-
Click the Auto Tagging switch so it shows On.
-
Read the warning, then click Confirm.

With Auto Tagging on, new transactions that match a rule are tagged automatically. QuickFile processes them in the background at intervals throughout the day, so a matching item may show Confirm for a short while before it’s tagged. You don’t need to stay logged in for this to happen.
To switch it off, click the switch again and click Confirm. QuickFile tells you Any future items will need to be confirmed manually.
Warning: Take extra care with Auto Tagging. A rule that’s set up wrongly can tag a large number of transactions incorrectly and create unwanted invoices.
How do I keep a rule for manual confirmation?
You can switch Auto Tagging on and still have some rules wait for your approval. This is useful for testing a new rule, or for transactions you always want to check.
When Auto Tagging is on, the Enabled column becomes Status and each rule has a traffic light. Click a light to set how the rule is used:
| Light | Meaning |
|---|---|
| Red (Disable) | The rule is switched off. |
| Amber (Manually confirm) | Matching transactions are never tagged automatically; they show Confirm for your approval. |
| Green (Auto tag) | Matching transactions are tagged automatically. |
-
Switch on Auto Tagging (see above).
-
In the Status column, click the amber light next to the rule.

Troubleshooting
Matching transactions show Confirm instead of being tagged
Check whether Auto Tagging is switched off under Banking > Bank tagging rules, or whether the rule’s light is amber. If Auto Tagging has only just been switched on, give QuickFile a little time: it tags matching items in the background.
My new rule hasn’t tagged transactions that are already on my statement
Rules only apply to transactions entered after the rule is saved. Tag existing transactions yourself, for example with bulk tagging.
I’m not offered the option to create a rule when tagging
QuickFile only offers it when it can pick out enough text from the bank reference. Create the rule manually from Banking > Bank tagging rules instead, and choose your own matching text.
The rule created a new invoice, but I’d already entered the invoice
Rules always create a new invoice, because QuickFile can’t tell which existing invoice a payment belongs to. Either untick Attach to an Invoice in the supplier rule, so the money is credited to the supplier’s account and you allocate it to the invoice yourself, or remove the rule and tag those payments manually. If the rule did create a duplicate invoice, you can delete it.
I see ‘Please enter 4 or more characters!’
The matching text must be at least 4 characters long. Use more of the bank reference, for example the full supplier name.
Related topics
New to bank tagging? Start with Tagging your bank transactions for how tagging works, then come back here to automate it.
- Tagging your bank transactions: How to tag a transaction by hand, bulk tag up to 50 items and use Bank Tagging Insights.
- Importing your bank statement: Upload a CSV statement so your rules can pick up the new transactions.
- Managing Open Banking Feeds: Connect a bank feed so transactions arrive, and get tagged, without uploads.
- Miscellaneous bank tagging: When to post a transaction straight to a nominal code, and why invoices are usually better.
- Prepayments and credits: Allocate money held on a supplier’s or customer’s account to an invoice later.